Wednesday, June 15, 2011
The end or the beginning?
We just laid there and he wept silently. The man I have always, since the beginning of my days , known so well, respected tremendously, loved beyond any rational description. I felt alive. For the first time in almost 4 years it was a real feeling instead of waiting, waiting, waiting. The unknown, the deep-in-a-hole feeling... for 30 something months. I felt alive while his world was crashing. We laid there, my arm around him and I loved him like I have never loved him before. I wanted to shout, but for every shout I just kissed him gently and silently. I wished he could see himself through my eyes and feel my heart - full of readiness to pick up the pieces and start from scratch. Nothing is lost, nothing is waisted. Nothing was for no reason. Yes, today is a dark day, and every bit of him is defeated. Everything seems pointless and I can see him slipping away and wanting to be left alone in the dark. But he will not sleep tonight, because of how wonderful he is. And for the same reason he will be great and be exactly what he feels his destiny is to be. I LOVE YOU OLIVER FREDERICK BENEDICT!!!! I love you. I am with you, behind you, around you. I am however you want me to be. I will go proudly with you wherever you'll take me. I'll cry with you if things around us fail, and I'll lough when you rise despite of them. We'll keep going till we reach it. And if for some, beyond this world, reason it will not happen, then damn, WE will die trying...
Sunday, May 1, 2011
Kohl's inspired hooded monster towel
Tristan's friend from next door has this very cute Hooded Monster T
owel that his mom bought at Kohl's a while ago.

It really is as cute as it looks on the picture and in my opinion it's a must-have for every little boy. So, because mama is not ok with spending $30 on a Monster Towel, she must try and make one by her self. And so I did!
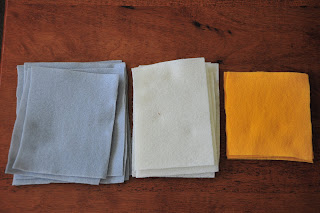
For one Monster Towel you will need 1 bath towel and 1 hand towel for the body and the hood. The orange towel is for horns and spikes (they are on the back, you can't see them on the picture) and it also will be a hood for my second towel for my daughter. The white hand towel I already had on hand (for the teeth) and I got the yellow-blue towel in DI for $0.50
for the yellow parts on monster's eyes.

Next, I made the stencils. Then pinned them on the fabric and cut them all out.

Next, I assembled the eyes. Each eye contains 3 parts- white, yellow and black. And black is just a circle cut out of cotton fabric. Then using zig-zag stitch on my sewing machine I sewed them on top of each other.

Next, horns. I sewed the two sides together and stuffed them only with 2 layers of scraps.

The teeth is the same story, except I didn't stuff them. Then I pinned and sewed all the pieces to the right side of the face and zig-zagged the raw edges.

Then put the back of the hood on top of the face and sewed it together. The hood was done. Next, the spikes. I didn't want them to be 3D so there wouldn't be any bumps, when the towel is laid down flat. I decided to just sew them on top of the towel using the zig-zag stitch.

Now, all that was left to do was to attach the hood and the towel together. The awesome part was that both pieces already had the original finished edge where I needed it, so it was not a big deal to figure it out how to make it look finished.

And it was done!!! The total cost is $8. Not so bad for a towel that looks just like the one from Kohl's and costs almost 4 times as much.
Friday, April 15, 2011
Say cheese!!!
The idea of being a photographer was a subject we never talked about in my house where I was growing up. I actually don't know what my mom has to say on that matter still now. I never told her that I wanted to research higher education programs in art, I kinda didn't dare to mention it. I was to become a lawyer and that was it. She was one. She still is. She serves as a prosecuting attorney for Latvian government and is not gonna be messed around with. When my husband is asked what my mom is like, this is what he sais - " Wool dress-suit, short hair cut, iron fist." Yeah...
I remember being 12 years old and dressing up in some of her pencil skirts and jackets and standing on front of the mirror announcing that this is what I am going to wear when I will be a lawyer. From there on she took every opportunity to remind me of how well respected, high earning and smart these people are. It is pretty much the best idea, the only way to go if you want to succeed in life. Brainwashing? Oh, definitely!!! I learned to love the idea and she loved it that I loved it. At that point in my life my career was the only clear thing in my future.
Then I remember being 20 and standing in front of her announcing that I hate law school and am never going back there again. I hated it! I lasted two years before admitting to myself, that this stuff is not for me in million years!
I haven't gone back to college again (except for the two semesters to BYU, but the reasons and experiences that came with that is another story) clearly because I have no idea what I want to study. Photography was one of the things I have always wanted to try. Just for fun. But the expensive equipment, skill learning and actual doing just always put it somewhere in "someday". Well, now I have a camera and time and I know for sure that this is my idea and this is what I want. So, I thought, what am I waiting for....
Thursday, April 14, 2011
Yellow summer wreath
I actually like a wreath on my door! I used to think that they are tacky, you know- fake flowers -but seeing the endless variety of styles and materials they can be made out of, I realized, I can find or make a wreath that I would absolutely love to hang on my front door.
A long time ago I bought a huge piece of fabric with intention to make matching skirts for me and my daughter for an outdoor photo-shoot. The event fell through and the skirts were never made.

Thinking about what colors I would like to incorporate in my wreath I remembered of this fabric and got inspired on the spot!!! Yellows and grays seemed the perfect match for me.
Then, another day I went for a run and found this old wreath on the side of the road. Of corse I couldn't let it stay there!

I had to work on it a little though. I stuck extra twigs in spots where it was a little thin and trimmed them all around to even it out.

I decided to spray paint it yellow and put felt rosettes on it. I got the paint with 40% off coupon in Jo-Ann's and felt for about $1.50 as I only asked them to cut it in about 5'' strips.
Then I cut the felt in squares. I wanted my gray rosettes be the biggest ones, so bigger squares for those.

Next step - take a pen and draw a spiral on one square (starting with the middle), so you know how to cut it. I noticed that the closer (more rings) the spiral is, the wider and flatter your rosettes will be. If you want your flowers to stand up higher, make your spiral "fatter". Once you get a feeling of how to cut it, you wont need to draw a spiral anymore.
Then staring with the outside end start rolling them up. Unless your rosette is very wide, you wont need to hot glue it as you go. When you are to the very middle of the spiral, just hot glue the end underneath the rosette to give it kind of a base. You know what I mean once you're there.

And that is the end result! Now I have a yellow wreath
on my door and I like it!

Monday, March 28, 2011
Fall wreath


This is a fall wreath I made las year. Simple twine base and fall color fabric rosettes on top. I love how it turned out. I think it's happy. The only thing was, that making those flowers takes some time.
Sunday, March 27, 2011
Spring burlap flower pot
I love spring and all the fresh green that it brings. Such an inspiring time of year. Don't you just want to open all your windows and let the sunlight saturated, spring rain sprinkled, full of new life air flood in your home! It makes me smile. For no money on this planet I would give up spring!
I got these for a dollar each and thought it would make a nice springy center piece for my dining table. I got a tulip, a hyacinth and a daffodil. The hope is that they will be not only still alive but also blooming right on the Easter Day.

The thing is- I love everything about them except the cheap looking black, plastic pots. So what is there else to do but make them look more my-style !
First thing I did, was, I looked for little square containers I could use as saucers, but I didn't have any. So I just wrapped the plastic shopping bag around the pot ( two bags on each pot), taped it loosely with scotch tape ( loosely, so it could still breath and not rot, when watered) and cut the excess off, creating a little water catcher.

Then I gathered some burlap scraps I already had on hand, glue gun, thread and needle and scissors.


I wrapped the darker burlap around the pot and created two different kinds of flowers out of the white one. Simply secured everything together with glue gun and it was done. I also cut a rectangle piece out of the white burlap and fringed it a little to make a matching runner. Unbelievable easy.
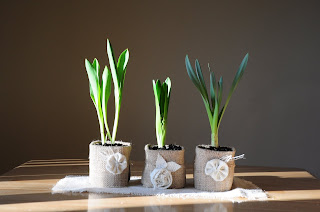
The end result!!!!
The total cost of the project : 3 plants -$3.00
burlap - about $0.50
Sunday, March 20, 2011
Shirt to dress


I had this shirt for about 4 years and had not worn it once. So I decided it deserves a better life than just hanging in the closet and collecting dust. I made a little blue dress out of it for Emma and now everybody is happy. No tutorial for this one either, because I did not take any pictures in the process as I didn't know I would like to blog someday about it. Although you can see that I cut the front and back panels out of it and sewed them together. Then attached little straps and it was done. Very very easy. I also made a little matching flower kinda thing for her hair. After I was done with this I almost wished I would have more not wanted pieces to turn into a part of Emma's wardrobe.
Go look in your closet, maybe there is something that deserves a second chance!
Subscribe to:
Posts (Atom)