Monday, March 28, 2011

Fall wreath


This is a fall wreath I made las year. Simple twine base and fall color fabric rosettes on top. I love how it turned out. I think it's happy. The only thing was, that making those flowers takes some time.

Sunday, March 27, 2011

Spring burlap flower pot


I love spring and all the fresh green that it brings. Such an inspiring time of year. Don't you just want to open all your windows and let the sunlight saturated, spring rain sprinkled, full of new life air flood in your home! It makes me smile. For no money on this planet I would give up spring!

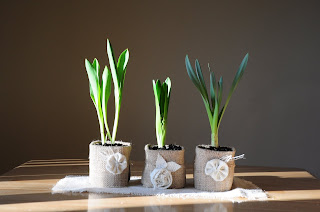
I got these for a dollar each and thought it would make a nice springy center piece for my dining table. I got a tulip, a hyacinth and a daffodil. The hope is that they will be not only still alive but also blooming right on the Easter Day.

The thing is- I love everything about them except the cheap looking black, plastic pots. So what is there else to do but make them look more my-style !

First thing I did, was, I looked for little square containers I could use as saucers, but I didn't have any. So I just wrapped the plastic shopping bag around the pot ( two bags on each pot), taped it loosely with scotch tape ( loosely, so it could still breath and not rot, when watered) and cut the excess off, creating a little water catcher.

Then I gathered some burlap scraps I already had on hand, glue gun, thread and needle and scissors.


I wrapped the darker burlap around the pot and created two different kinds of flowers out of the white one. Simply secured everything together with glue gun and it was done. I also cut a rectangle piece out of the white burlap and fringed it a little to make a matching runner. Unbelievable easy.


The end result!!!!
The total cost of the project : 3 plants -$3.00
burlap - about $0.50

Sunday, March 20, 2011

Shirt to dress


I had this shirt for about 4 years and had not worn it once. So I decided it deserves a better life than just hanging in the closet and collecting dust. I made a little blue dress out of it for Emma and now everybody is happy. No tutorial for this one either, because I did not take any pictures in the process as I didn't know I would like to blog someday about it. Although you can see that I cut the front and back panels out of it and sewed them together. Then attached little straps and it was done. Very very easy. I also made a little matching flower kinda thing for her hair. After I was done with this I almost wished I would have more not wanted pieces to turn into a part of Emma's wardrobe.

Go look in your closet, maybe there is something that deserves a second chance!

Ruffled skirt

There is something you should know about me. If I have a vision in my head for what I want and for how much I want it (and the emphasis is on FOR HOW MUCH), than it can go two ways-

1. I just walk in the store and there it is and I am sooo excited that I will not stop talking about my find for next five days and the life is just awesome. Or....

2. I will spend two and a half weeks going from store to store hoping to see my vision on the next rack, cursing quietly at children's clothing fabricators for producing every imaginative thing possible for a little girl to wear, except for what I need. In this case life is still awesome, it just got a little more complicated.

So, If the second scenario happens I usually have no choice, but figure out how to create the thing I have imagined by my self.

About 3 weeks ago it happened. The second way. I wanted to get a dark color ruffled skirt for Emma for under $5, that she could wear to the church. Could not find it. Was either not dark, not ruffled or way over my budget. So I made my own.

To my surprise, it was not as complicated as I thought it would be. At the time I did not have a blog yet, so there are no detailed pictures for tutorial. I had a half yard or fabric which I got in Walmart from their discounted fabric shelf and a piece of elastic. The total cost is about $0.85.

To brake it down as much as I can on how I made it, I can only tell you this-

I cut the fabric lengthwise in 6 strips, gradually increasing the length for lower layers.
Hemmed and scrunched up the ruffle strips and sowed it all together. There are no zippers, or buttons involved, except the one on the flower I added at the end. It took me about a day and a half to finish it (and that's why I said that life is still wonderful just gets more complicated) but I think it turned out well and Emma absolutely loves it!!!